The Import Export Product Extension for Magento 2
Magento 2 Import Export is one of the most powerful Import Export in the market.
You can use Magento 2 Products Import Export extension to import export products in bulk with categories, multiple images and custom options from CSV file. It is possible to handle up to 25,000 products even more in a single process while there is no interruption.
Until now, there are so many vendors providing Magento 2 Products Import Export extension which is quite similar. This makes consumers confused to choose the best. Let us scroll down to compare objectively about Products Import Export extension for Magento 2 among the reliable providers on Magento Connect.
- When you installed successfully you will see a new menu and new tab inside your admin panel

- Step 2 is backup your store before doing anything. See why in Common Errors/Mistakes.
- Next you need to create a new profile.
A profile is an xml structure that defines your settings for what you want to export/import.
To create a new profile:

- After creating profiles, you need to choose which profile you want to use. You can go to settings either from tab or extension’s top menu.
Inside settings menu, choose your preferred profile from drop down menu

- Now that all are set and done. Go to GUI to export/import products

Each button is responded for each profile in previous step.
Export
- You can see that there are 3 buttons for exporting but it’s actually all in your xml file. I will divide to Export All Fields and Export Custom Fields.
- Though, there are 2 types of output file: XML and CSV., throughout this guide i will go with CSV
1. Export All Fields.
- Default profile for All Fields is Export General

- All XML content is inside this pastebin, link here: <
<action type="mage_productimportexport/import_product" method="load"> <var name="store"><![CDATA[0]]></var> <var name="filter/adressType"><![CDATA[default_billing]]></var> </action>
This “load” method is default for all Export Profiles, it loads all default fields that needed for exporting and also responds for filter attributes (will cover in 2. Export Custom Fields) By defining: “filter/adressType” = “ default_billing”, you’re exporting All Fields without filtering.
<action type="mage_productimportexport/export_product" method="unparse"> <var name="store"><![CDATA[0]]></var> <var name="recordlimitstart"><![CDATA[0]]></var> <var name="recordlimitend"><![CDATA[10]]></var> <var name="export_category"><![CDATA[true]]></var> <var name="export_related_products"><![CDATA[true]]></var> <var name="export_upsell_products"><![CDATA[true]]></var> <var name="export_crosssell_products"><![CDATA[true]]></var> <var name="export_grouped_products"><![CDATA[true]]></var> <var name="export_tags"><![CDATA[true]]></var> <var name="export_reviews"><![CDATA[true]]></var> </action>
Method “unparse” is used for exporting products. Declaration of this method is inside this file: app/code/local/Magegiant/Productimportexport/Model/Export/Product.php
<var name="store"><![CDATA[0]]></var>
- Usually store is Admin and store_id is 0, that’s why you put 0 in there. - recordlimitstart and recordlimitend are used to limit the number of products that you want to export - The rest are self-explained, if you don’t want to export those fields, simply change from “true” to “false”.
<action type="dataflow/convert_parser_csv" method="unparse"> <var name="delimiter"><![CDATA[,]]></var> <var name="enclose"><![CDATA["]]></var> <var name="fieldnames">true</var> </action>
- type “..convert_parser_csv” is because I’m choosing CSV for output format. - “fieldnames” = “true” means first row in output file is field names (product_name, sku, price..). Otherwise it’s will start with exported data.
<action type="dataflow/convert_adapter_io" method="save"> <var name="type">file</var> <var name="path">var/export</var> <var name="filename"><![CDATA[export_products.csv]]></var> </action>
- “path” is where your exported file is saved. - “filename” is your exported file’s name. - So output file will be put here: public_html/yourMagentoFolder/var/export/export_products.csv
- You can choose Basic Information or Stock Update to see default XML content of exporting custom fields. I will use Basic information in the example below.
- Content of this XML is here: http://pastebin.com/RUAZHeFw - Here is differences:
<action type="mage_productimportexport/import_product" method="load"> <var name="store"><![CDATA[0]]></var> <var name="filter/adressType"><![CDATA[default_billing]]></var> <var name="filter/name"><![CDATA[suit]]></var> <var name="filter/sku"><![CDATA[su0]]></var> <var name="filter/price/from"><![CDATA[10]]></var> <var name="filter/price/to"><![CDATA[1000]]></var> <var name="filter/qty/from"><![CDATA[1]]></var> <var name="filter/qty/to"><![CDATA[300]]></var> </action>
<action type="dataflow/convert_mapper_column" method="map"> <var name="map"> <map name="name"><![CDATA[name]]></map> <map name="sku"><![CDATA[sku]]></map> <map name="type"><![CDATA[type]]></map> <map name="image"><![CDATA[image]]></map> <map name="small_image"><![CDATA[small_image]]></map> <map name="thumbnail"><![CDATA[thumbnail]]></map> <map name="is_in_stock"><![CDATA[Available]]></map> </var>
- “filter/name” is filter all products that start with name’s value (same as “like” query in SQL) To understand more about this filter, you can check load() function which can be found here: app/code/local/Magegiant/Productimportexport/Model/Import/Product.php
- You can put the field that you want to export inside map name, inside CDATA[] is your custom header in exported file. Look at my is_in_stock field, “Available” will display as column’s header.
My suggestion is keep the default value if you want to use this export file to re-import again. Because by default, importing process checks for is_in_stock header not ‘Available’. So only use custom header for your report.
- Q&A Q: How to know the filter values, map field names? A: Use default magento export to get those values. 2.1/ Go to System->Dataflow - Profiles 2.2/ Create a new profile or choose a default export profile. 2.3/ Setup filters. 2.4/ Save and Check Profile Action XML tab.
3.1 Export Images:
- “absolute_image_url” will export image’s url with your store address (direct and full image link). Instead of ‘i/m/image1.jpg/, it gives ‘https://www.yourstore.com/media/catalog/product/i/m/image1.jpg’ This is for using “import_remote_image_url” when setting import profile.
May be it becauses you set number of exporting products too large while your server settings don’t allow. To export a big number of products, it needs time and resources.
- If your server has its timeout too small, server will cancel exporting process. - You have set timeout big enough but server memory isn’t enough, exporting process consumes too much memory so server stops or even dies.
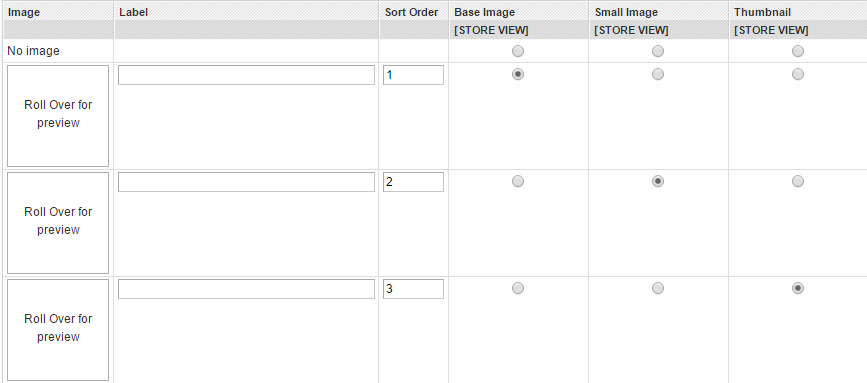
Suggestion is only export 500 products at a time. When you check exported file, you see 3 columns base_image, small_image and thumbnail_image share the same value, even you have more than 3 images inside.
Problem is all settings go for 1 image, and the other are your gallery photos. So to export all images for products have this kind of setting, add export gallery to map field too. <map name="gallery"><![CDATA[gallery]]></map>
If you see your setting like this (3 dots in 1 line)
Make sure you set it right, like this:
- Change “delete_images_before_import” to True <var name="delete_images_before_import"><![CDATA[true]]></var>
2. Export Custom Fields
3. Other Export Problem:
Import
1. Import Images
Common Errors/Mistakes.
Make sure that you set correct permission for media, var folders (sub folders too).
1. Export takes too long or Fatal error: Allowed memory size of X bytes exhausted (tried to allocate Y bytes)
2. Only export one image.
3. Import Duplicate image for each attribute (base, small, thumb)